¶ Multi-Tenancy Kubernetes Protection
Back in 2018 – VMware acquired Heptio, which produced a product called Heptio Ark that cloud native disaster recovery and data migration tool for Kubernetes applications. The Heptio Ark product was renamed to Velero after the acquisition finalized.
Velero empowers Kubernetes users to back up and restore their cluster resources and persistent volumes using the AWS S3 API (or S3-compatible storage). This post explores how Velero stores backups securely in S3 buckets via the Object Storage Extension, enabling disaster recovery, migration, and data protection strategies for modern cloud-native environments.
In this blog post, we will be covering how to configure an External Kubernetes Cluster.
¶ Supported Kubernetes Models
- Tanzu Kubernetes Grid clusters of VMware Cloud Director Container Service Extension
- External Kubernetes Clusters
¶ Velero Compatibility Matrix
| Velero version | Expected Kubernetes Version Compatibility | Tested on Kubernetes Version |
| 1.11 | 1.18-latest | 1.23.10, 1.24.9, 1.25.5, and 1.26.1 |
In the Object Storage Extension releases, we leverage the following Velero versions:
| VMware Cloud Director Object Storage Extension | Velero |
| 2.2.2 | 1.10.0 |
| 2.2.3 | 1.11.0 |
| 3.0, 3.1 | 1.11.1 |
¶ Architecture Featuring Cloudian HyperStore
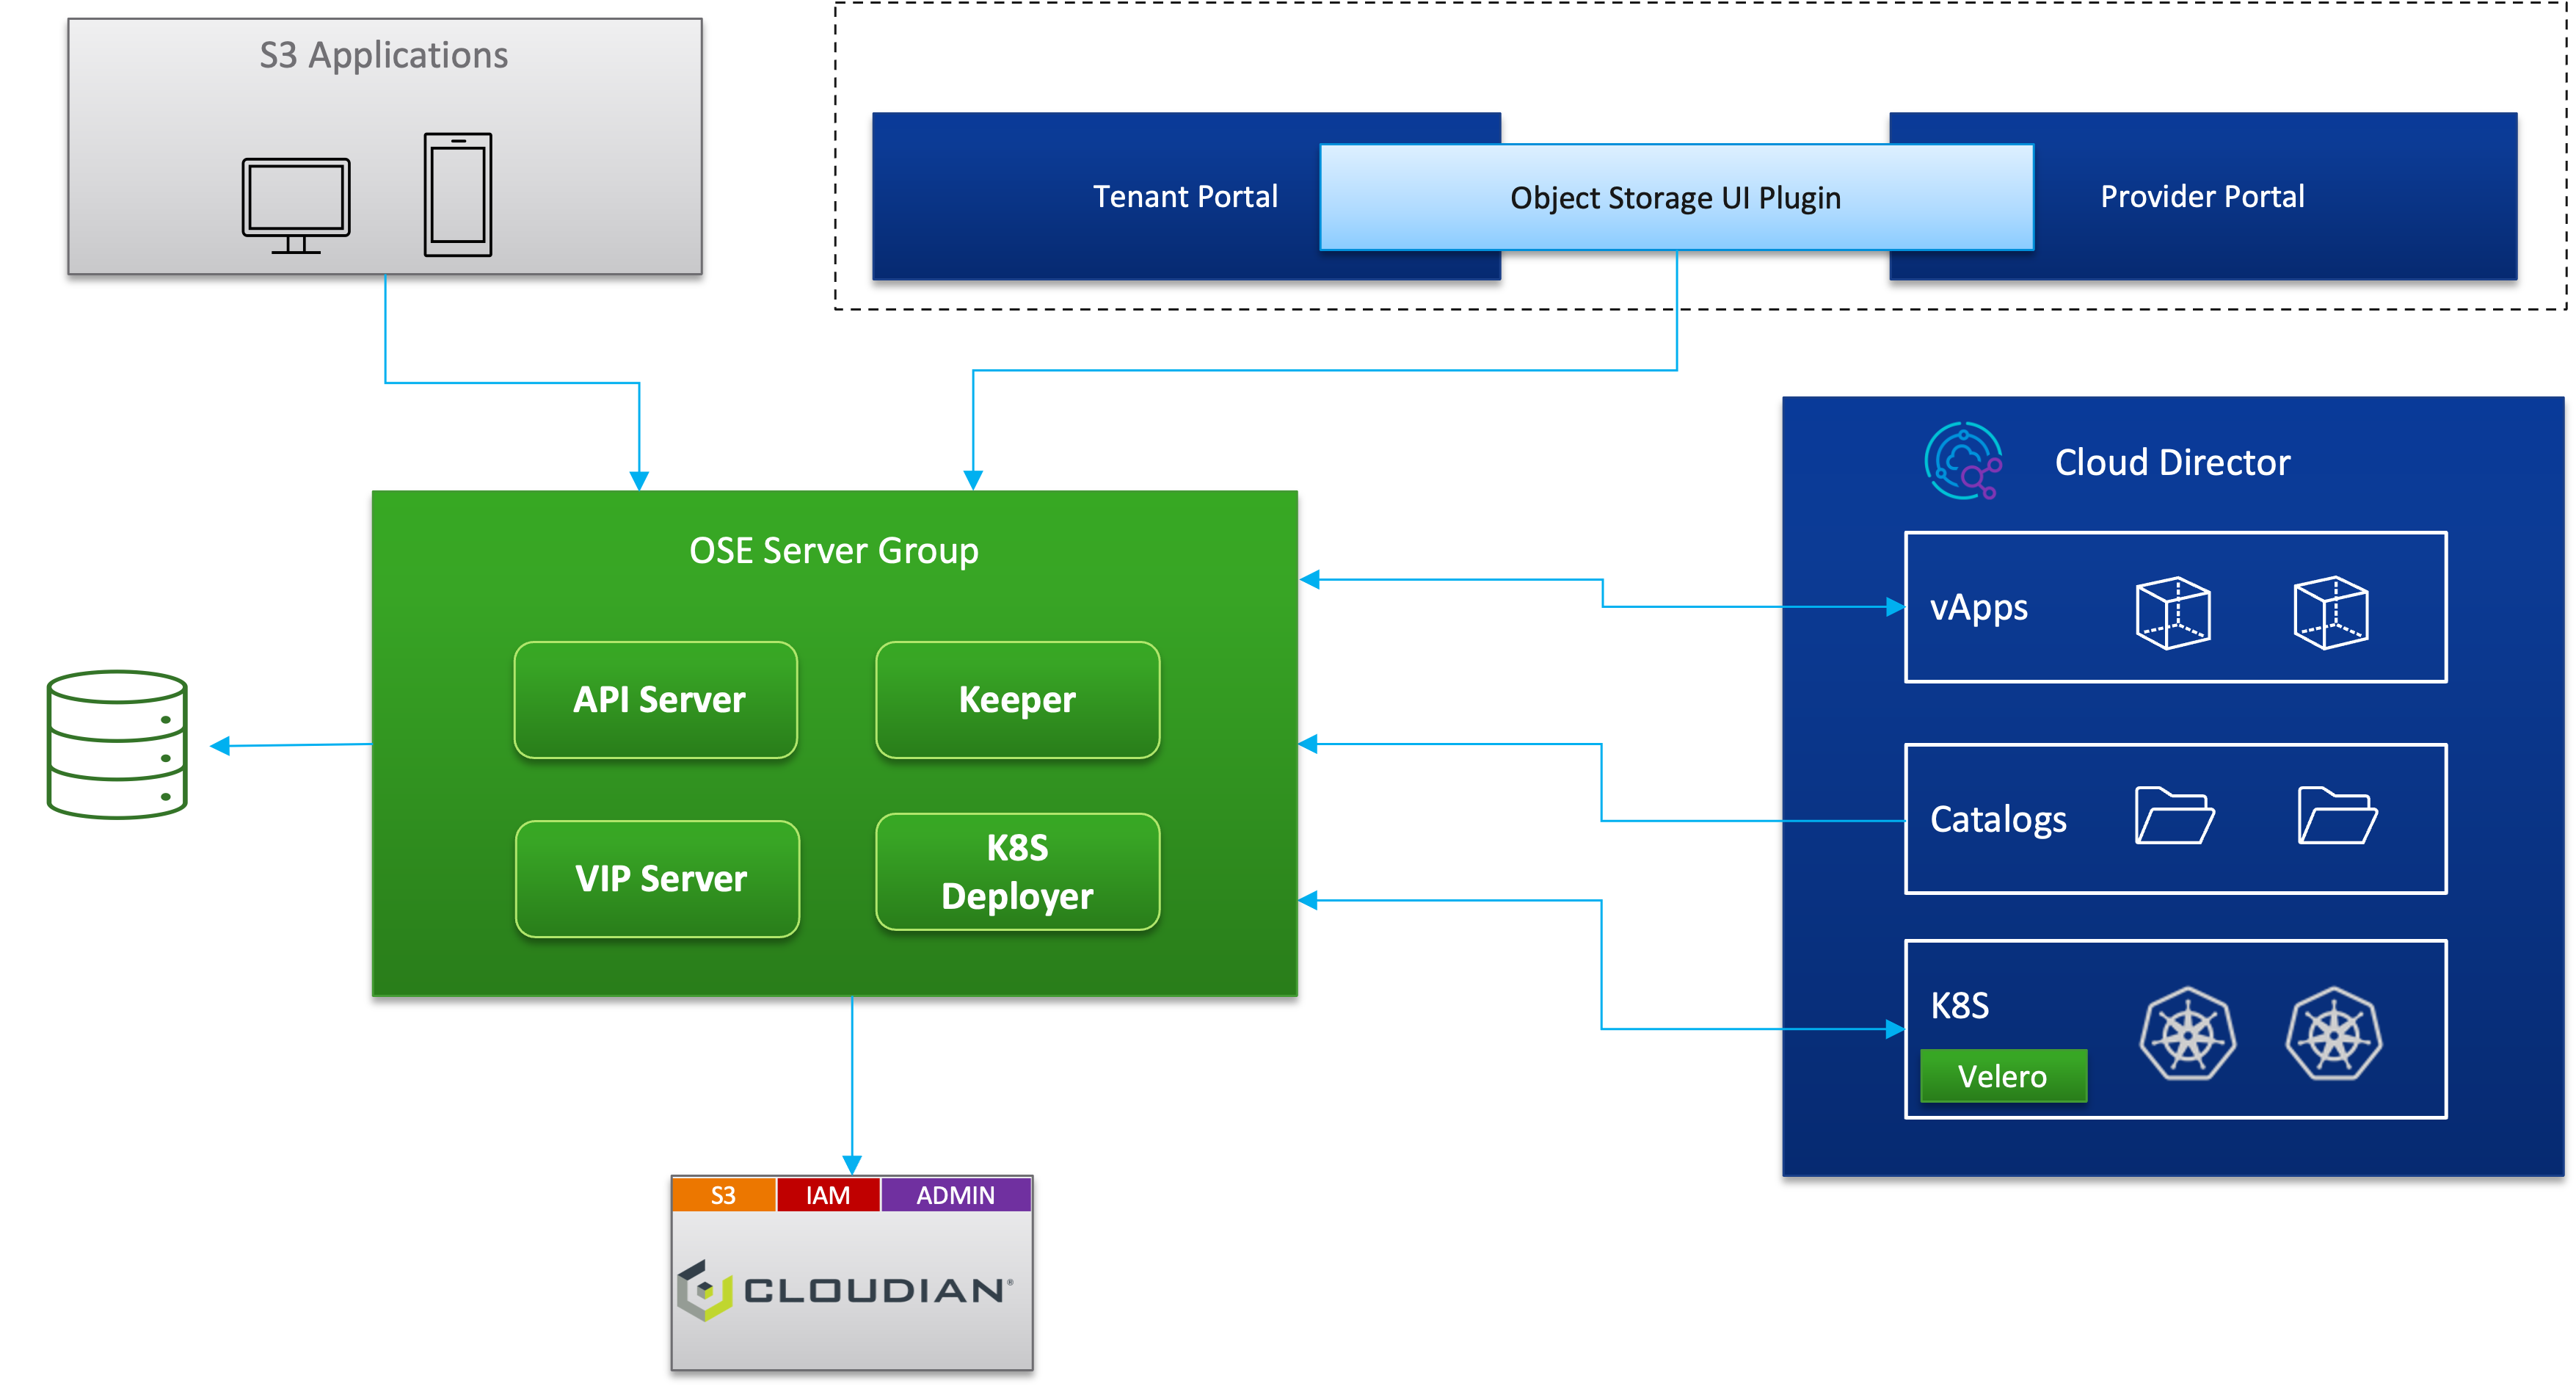
¶ Kubernetes Cluster Backup and Restore Workflow

¶ Configure an External Kubernetes Cluster
1. Download your kubernetes config file
$HOME/.kube/config2. Navigate to to the Object Storage Extension and select Kubernetes Protection in the Tenant Portal.
- Ensure you're logged in as an Organization Administrator or a Tenant User with the Kubernetes Contributor Role.
- Kubernetes Contributor Role: A Kubernetes contributor can backup and restore guest Kubernetes clusters.
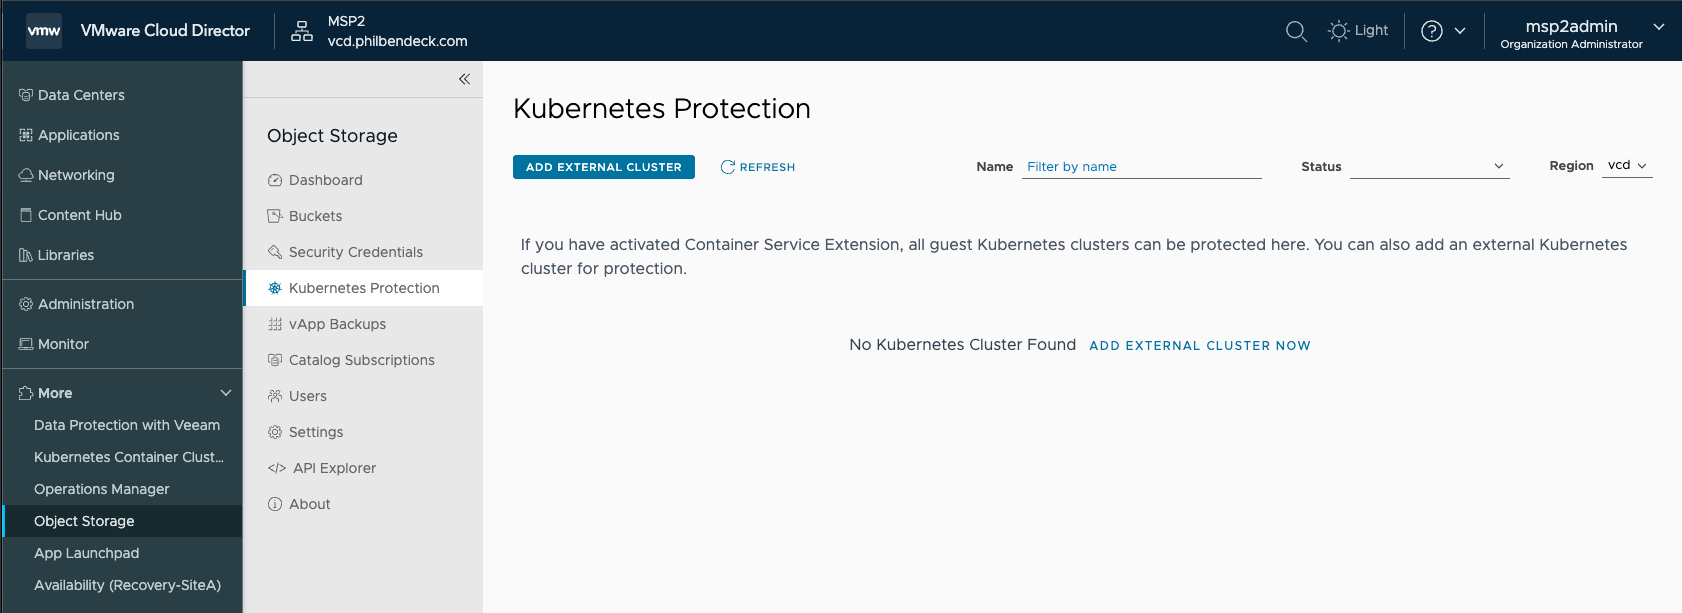
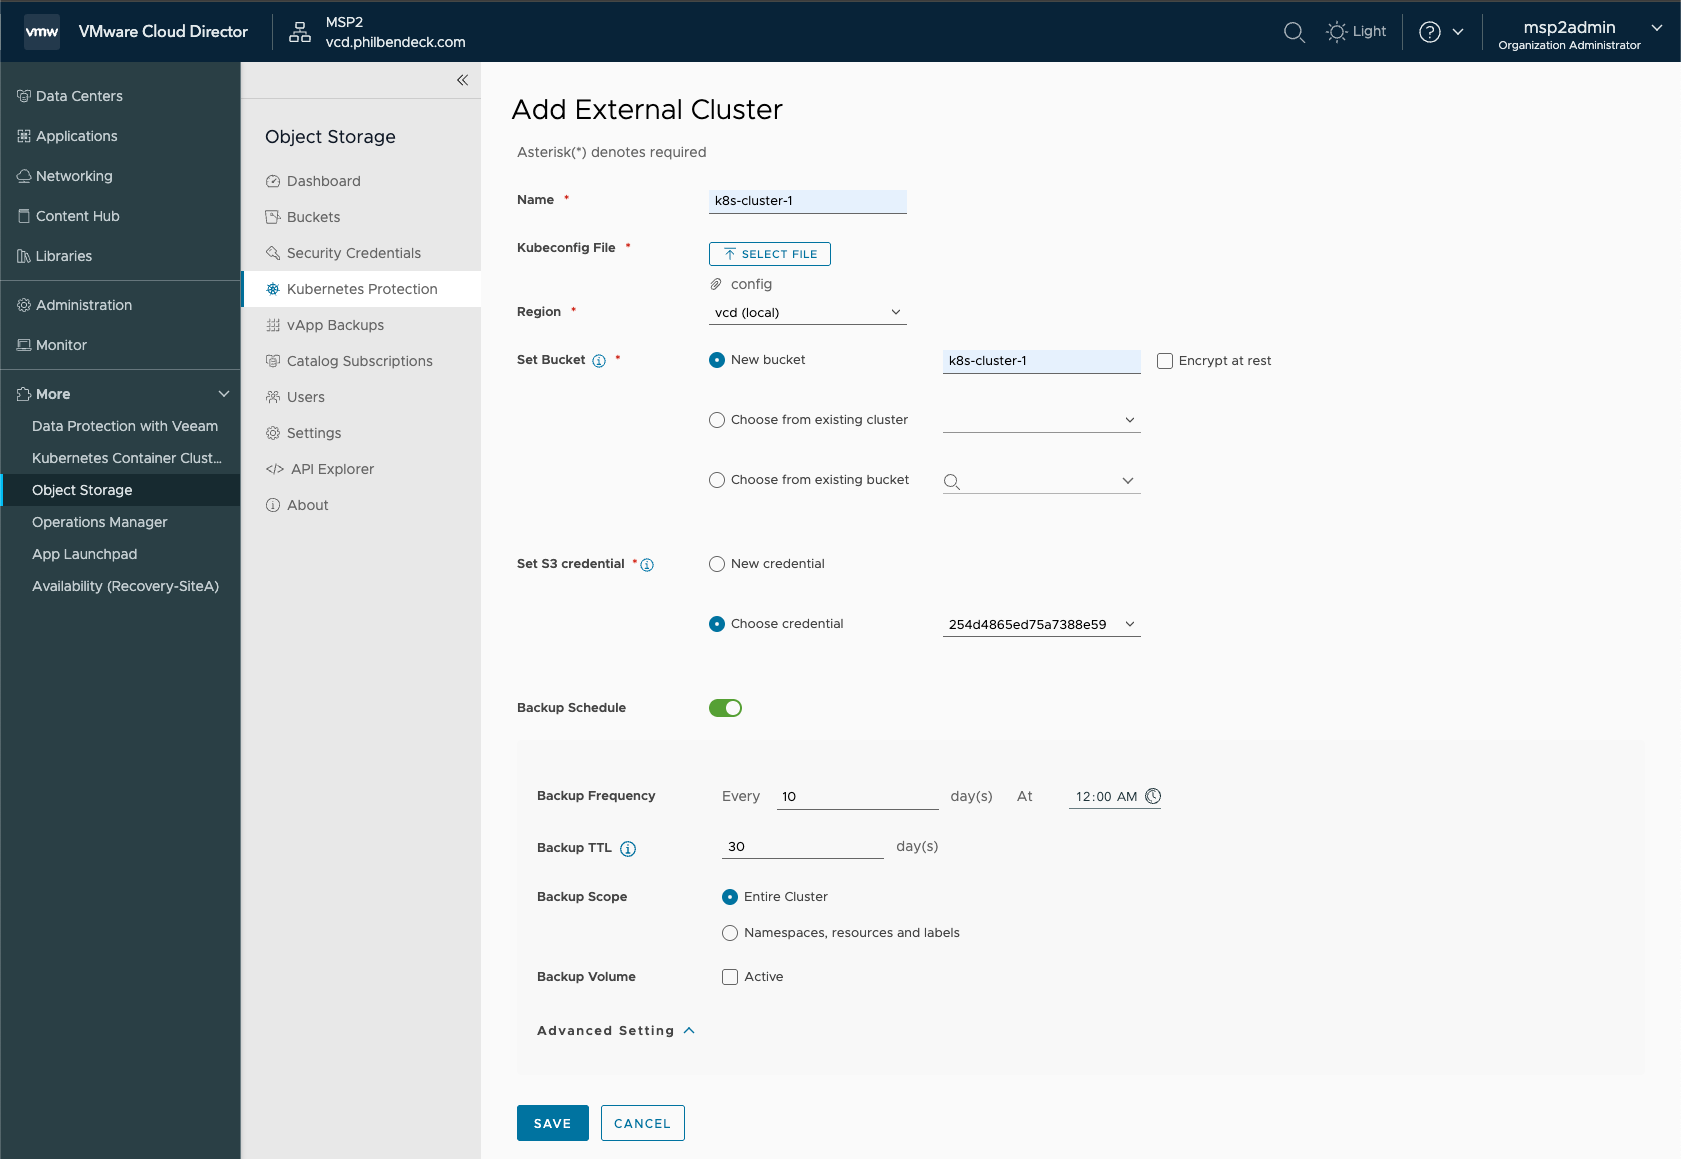
3. Select ADD EXTERNAL CLUSTER
- Enter a name for the cluster.
- Click Select File and select the
kubeconfigfile. - Select a destination region to backup the cluster.
- Set the backup bucket.
- You can create a new bucket, select an existing cluster or select an existing bucket.
- To enable encryption, select the Encrypt at rest check box.
- Select an existing S3 credential or create a new credential.
- To activate a scheduled backup, turn on the Backup Schedule toggle and customize the Backup Frequency, Backup TTL and Backup Scope.
- Backup Scope: Entire Cluster or Namespaces, resources and labels
- Click SAVE. The external cluster is added under Protected Clusters.
4. Once you execute the SAVE action, OSE automatically invokes API calls to the Kubernetes cluster to deploy and install the necessary Velero components as containerized pods:
kubectl get pods -n velero
NAME                      READY   STATUS      RESTARTS   AGE
node-agent-5m5kb          1/1     Running     0          31s
ose-velero-k4v9l          0/1     Completed   0          62s
velero-6c4867f7f8-t49hc 1/1 Running 0 31s5. In the Kubernetes Protection tab, you will see that we now have our k8s-cluster-1 ready to be protected for disaster-recovery.
6. While OSE traverses data from the Velero containerized pods, the Protection Status = Start Protecting.
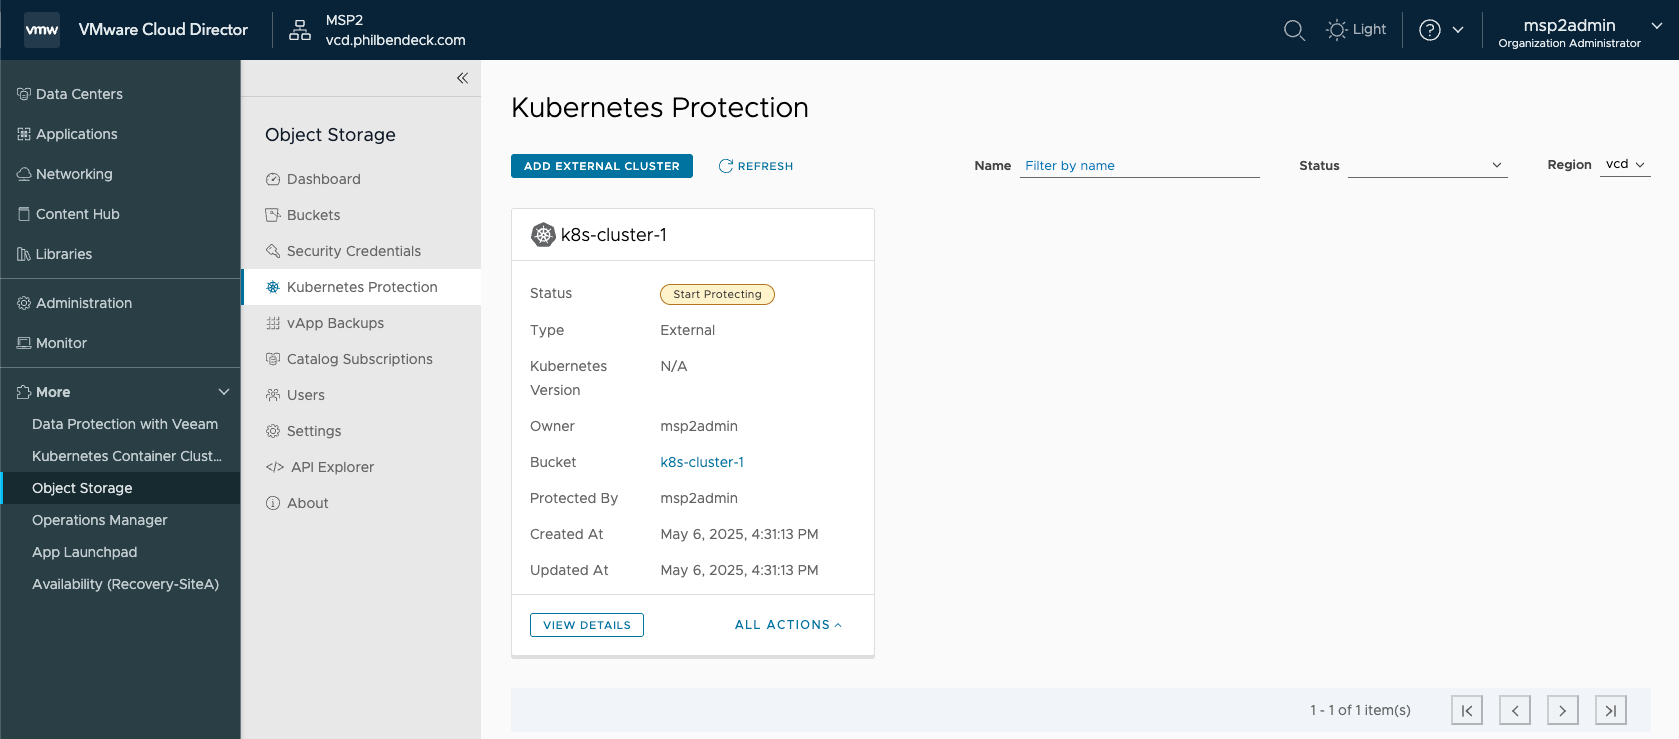
- This process takes a few minutes to complete.
7. Now that the process has successfully completed, the Status = Protected

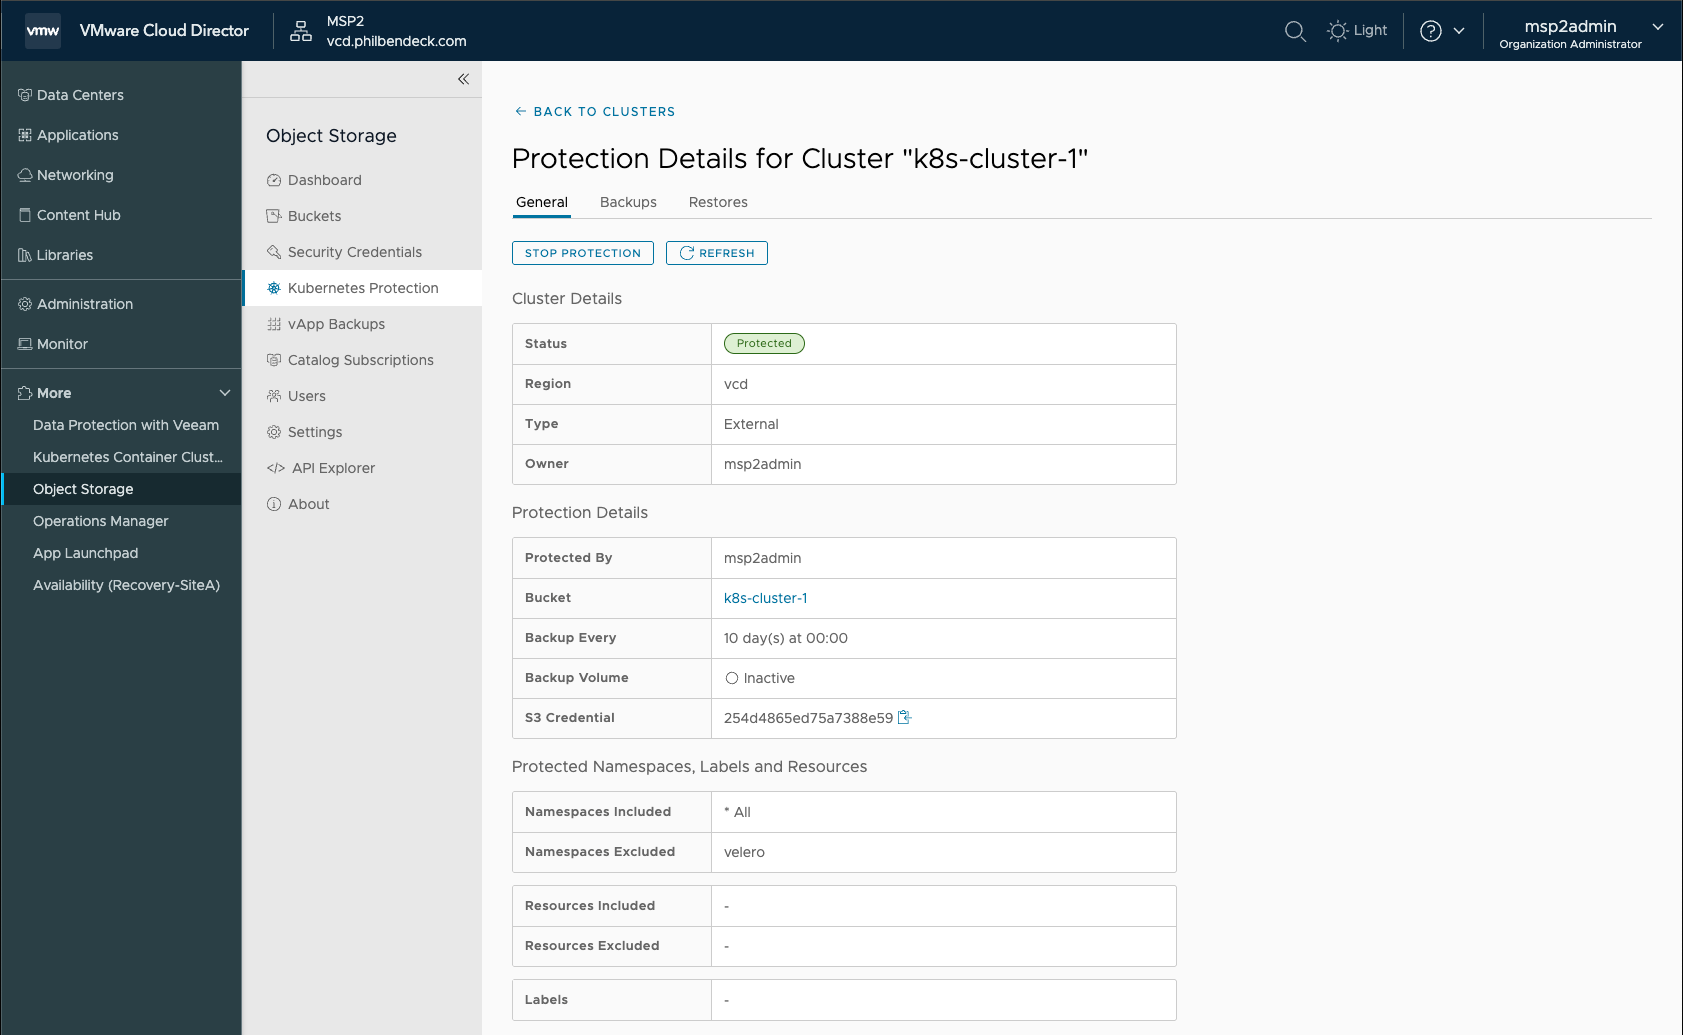
¶ Protection Details for Cluster "k8s-cluster-1"
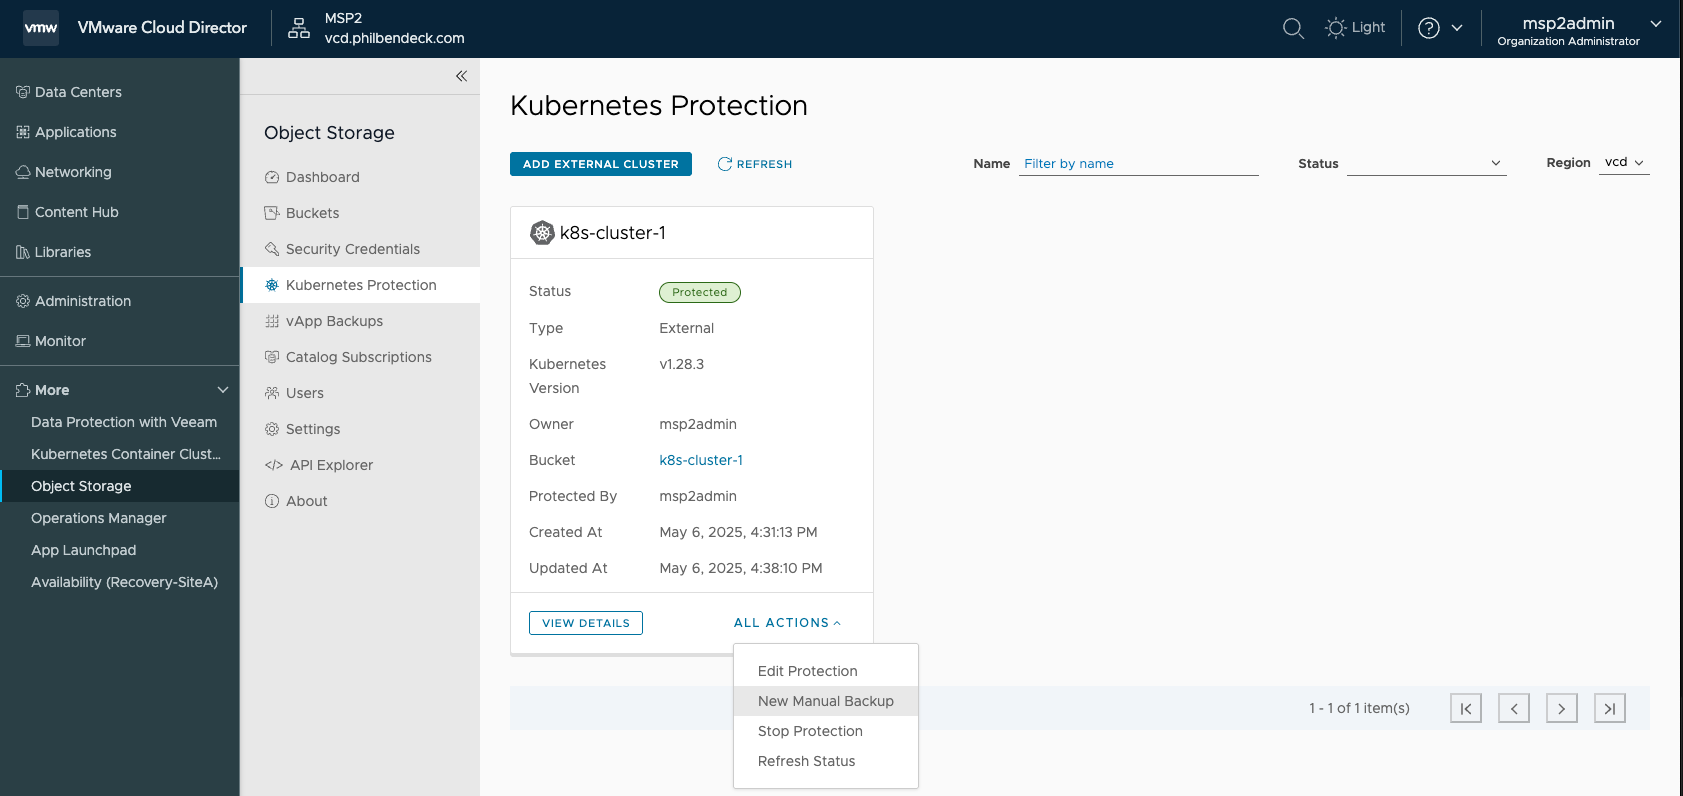
¶ Creating a Manual Backup
1. Go to ALL ACTIONS > New Manual Backup
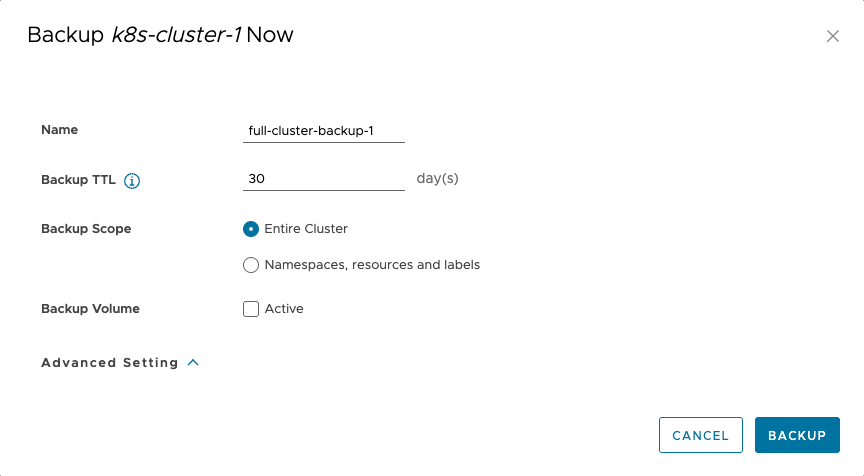
2. We will be backing up the Entire Cluster:
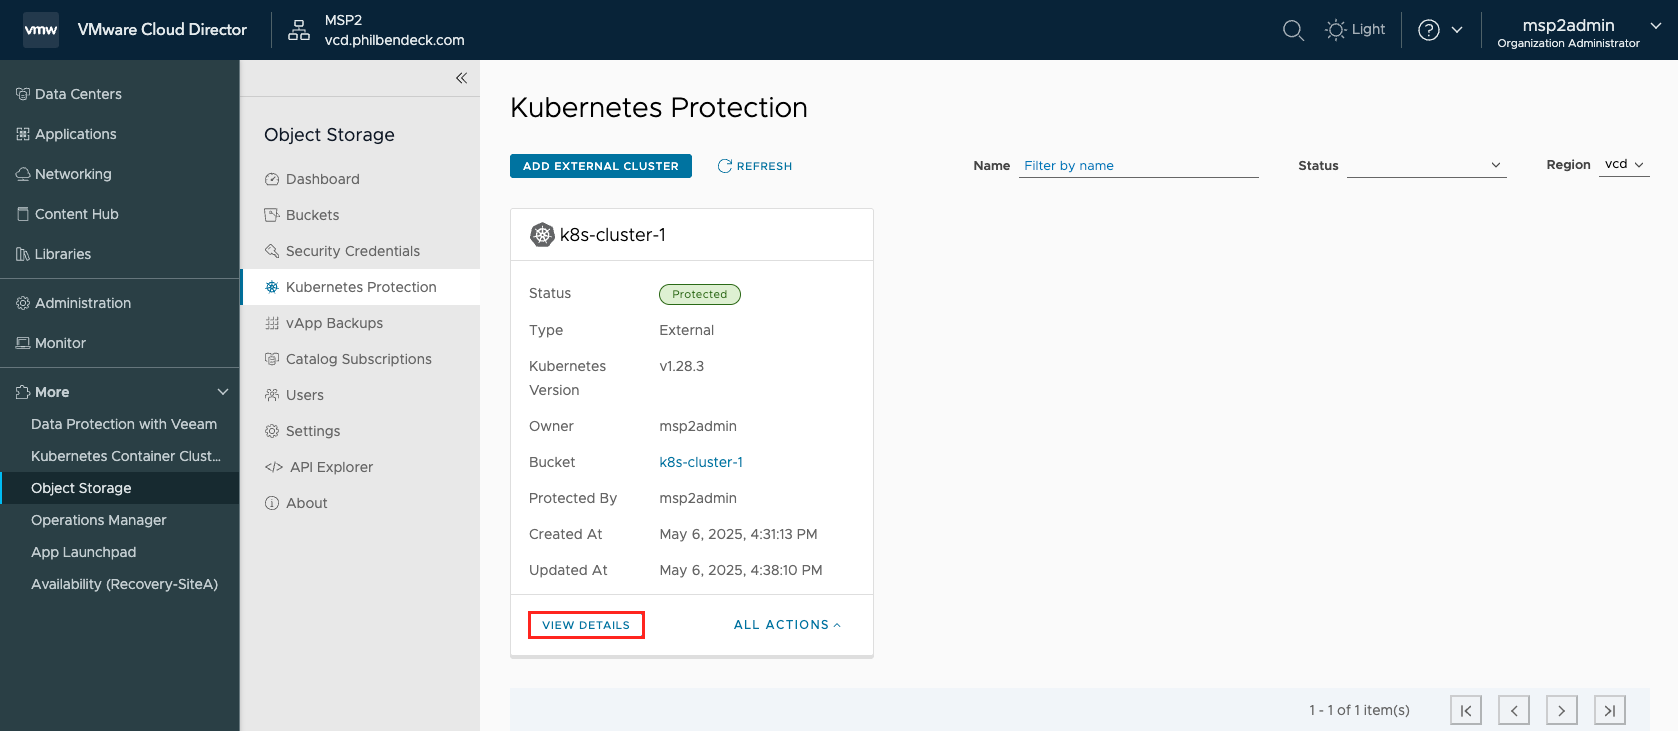
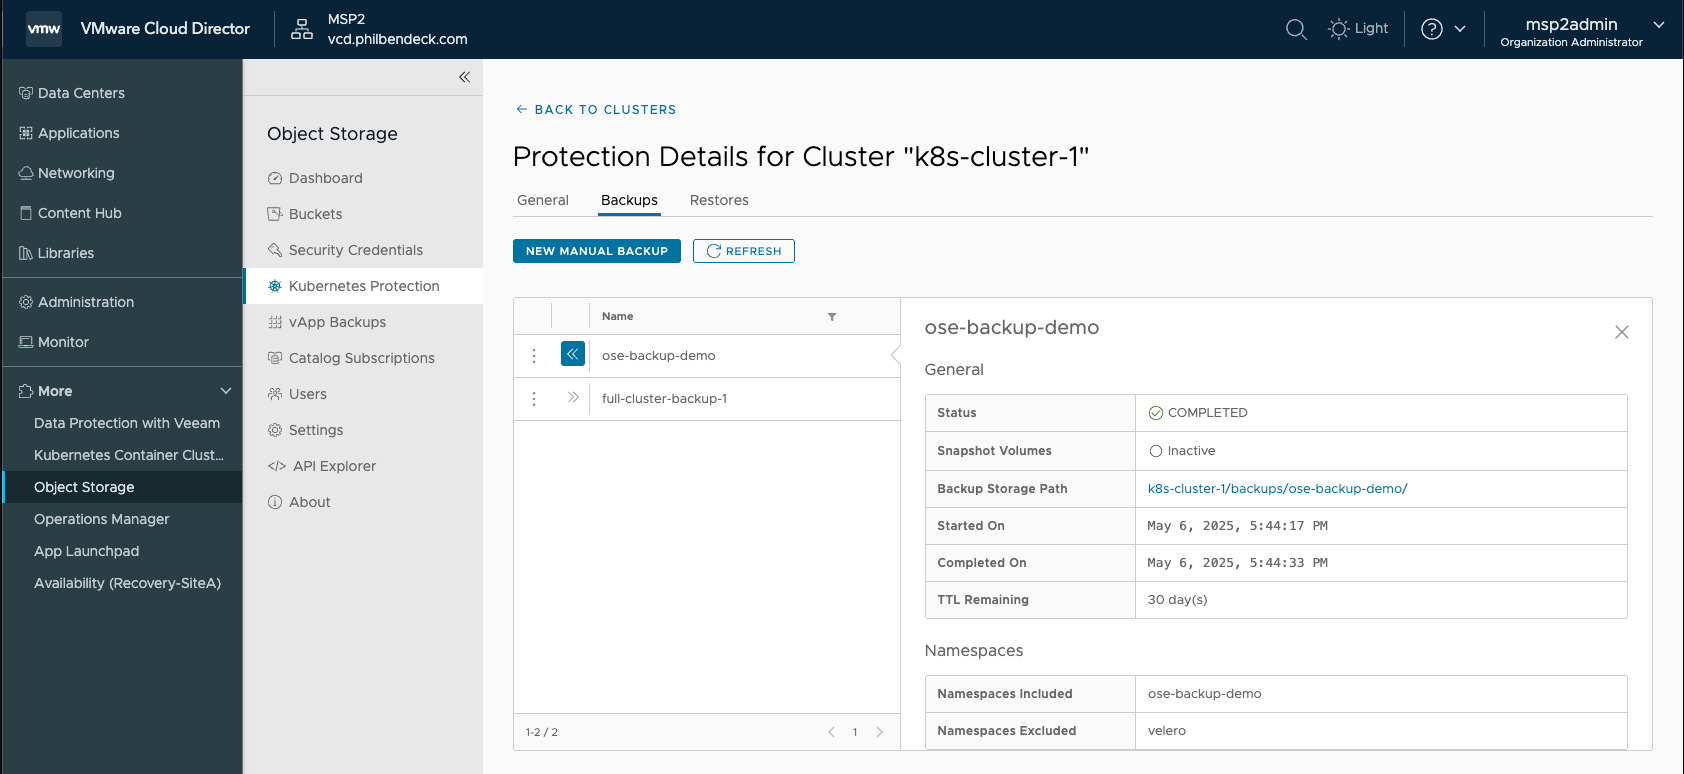
3. We can check the progress by going to VIEW DETAILS and selecting the Backups tab.

- As you can see from the screenshot above, we successfully backed up all the namespaces deployed on the Kubernetes Cluster.
¶ Restoring from a Backup
For this demonstration, I will create a sample busybox container under it's own namespace.
1. Create the namespace
kubectl create namespace ose-backup-demo2. Run a BusyBox pod in that namespace:
kubectl run test-busybox -n ose-backup-demo --image=busybox --restart=Never --command -- sleep 36003. Confirm the pod is running:
kubectl get pods -n ose-backup-demo4. Ensure the test-busybox pod is running:
kubectl get pods -n ose-backup-demo
NAME           READY   STATUS    RESTARTS   AGE
test-busybox 1/1 Running 0 3s5. Let's create a backup of the ose-backup-demo namespace:
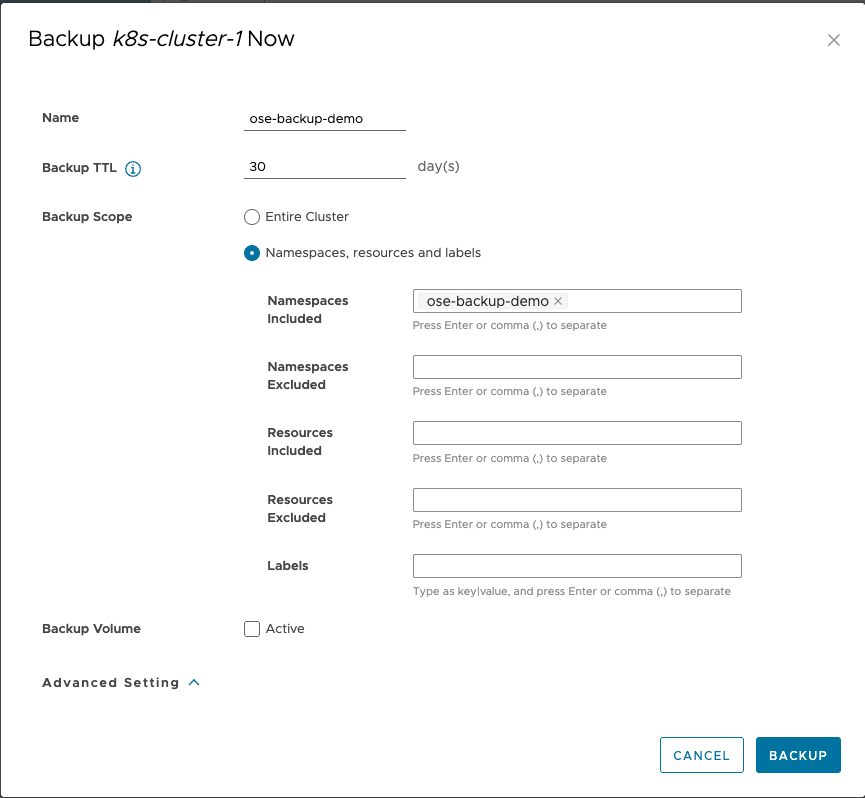
6. Delete the test-busybox pod
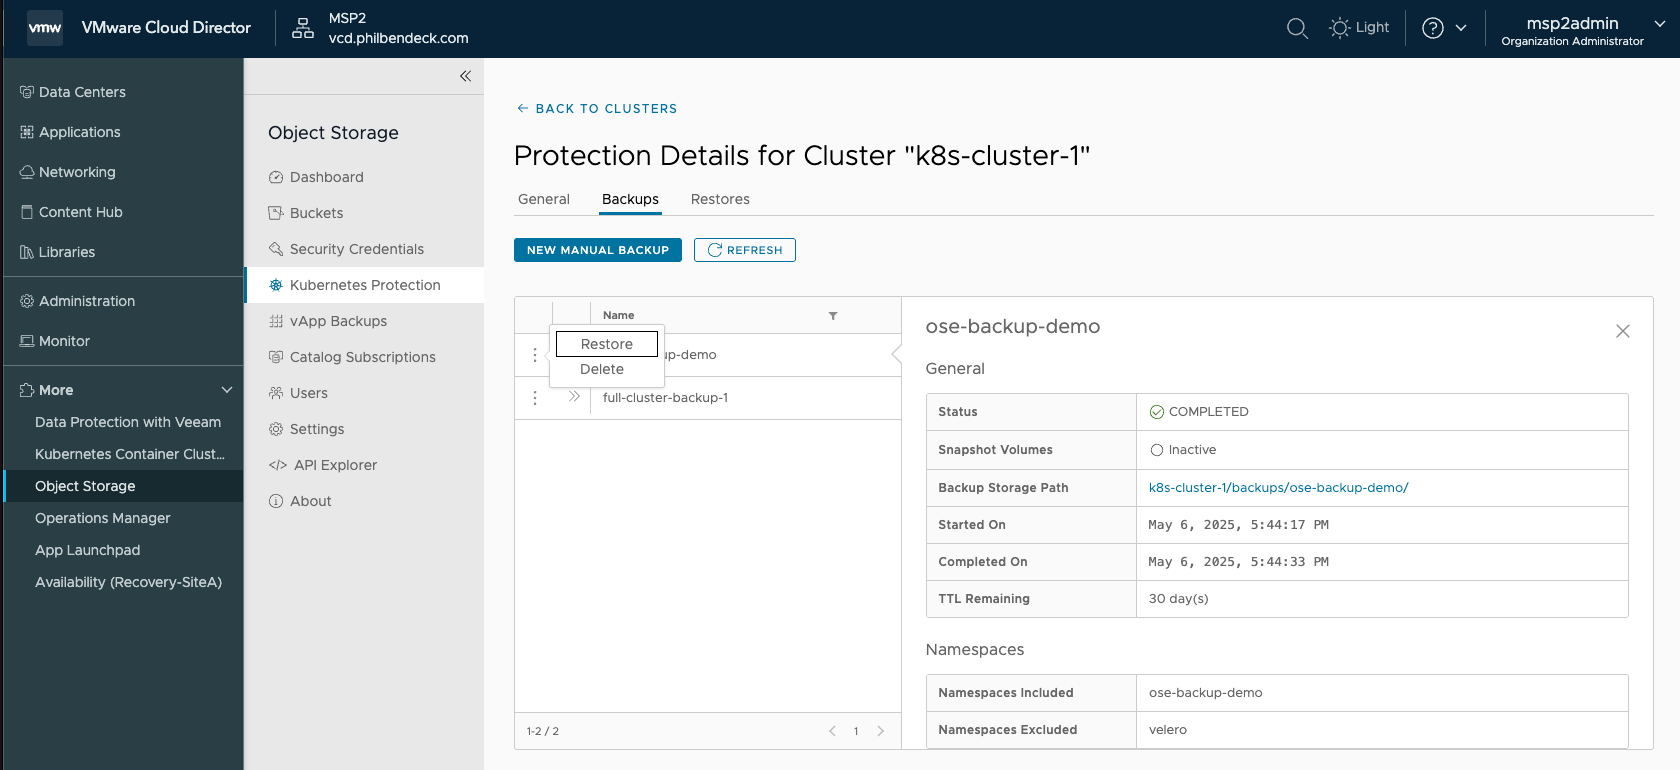
kubectl delete pod test-busybox -n ose-backup-demo7. Restore the namespace by selecting the ellipses > Restore:
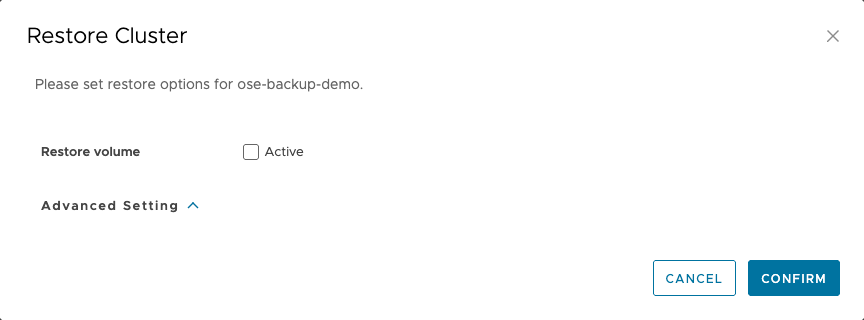
8. Select CONFIRM
9. Examine the Restore Status:
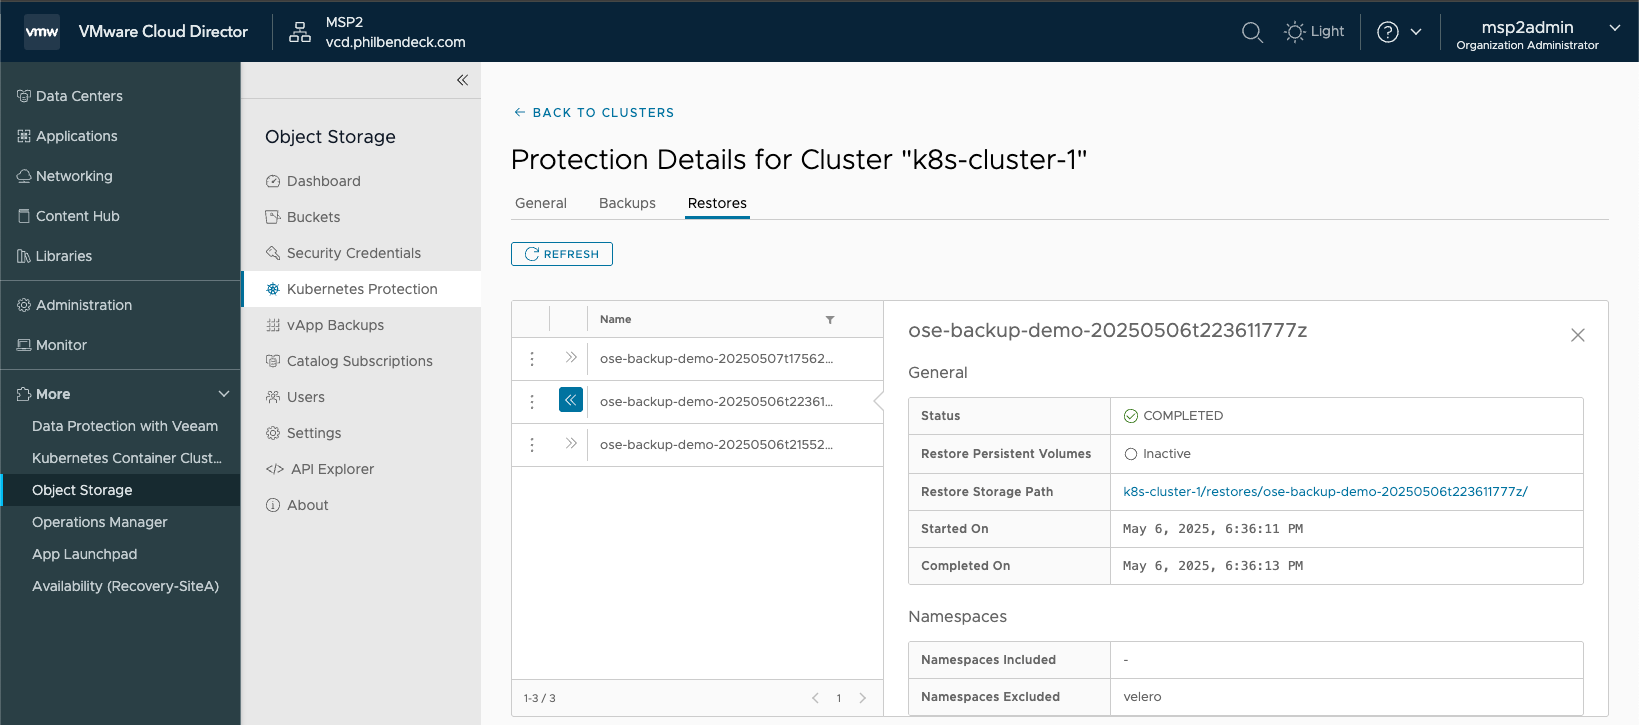
10. You will see that the Velero API will interact with the Kubernetes Cluster and restore the pods
kubectl get pods -n ose-backup-demo
NAME           READY   STATUS              RESTARTS   AGE
test-busybox   0/1     ContainerCreating   0          3s

kubectl get pods -n ose-backup-demo
NAME           READY   STATUS    RESTARTS   AGE
test-busybox 1/1 Running 0 4s¶ Restoring with PVC
For this demonstration, I will create a sample busybox container under it's own namespace.
1. Run a busybox pod in that namespace (Ensure it's associated with a PVC):
# pod-with-pvc.yaml
apiVersion: v1
kind: Pod
metadata:
  name: test-busybox-pvc
  namespace: ose-backup-demo
  annotations:
    backup.velero.io/backup-volumes: storage
spec:
  containers:
    - name: busybox
      image: busybox
      command: ["sleep", "3600"]
      volumeMounts:
        - name: storage
          mountPath: /mnt/data
  volumes:
    - name: storage
      persistentVolumeClaim:
claimName: test-pvc2. Confirm the pod is running:
kubectl get pods -n ose-backup-demo | head -n 1 && kubectl get pods -n ose-backup-demo --no-headers | grep test-busybox-pvc3. As you see in the output below, I have a pod test-busybox-pvc that references a PVC
NAME               READY   STATUS      RESTARTS   AGE
test-busybox-pvc 1/1 Running 0 48m4. To check if a container (in a pod) has a Persistent Volume (PV) mounted via a Persistent Volume Claim (PVC), you can do the following:
kubectl -n ose-backup-demo describe pod test-busybox-pvc
Volumes:section → should list your PVC (e.g.,test-pvc)Mounts:under your container → should show mount path (e.g.,/mnt/data) and the volume name (e.g.,storage)
Name:             test-busybox-pvc
Namespace:        ose-backup-demo
Priority:         0
Service Account:  default
Node:             k8s-template/192.168.1.100
Start Time:       Thu, 08 May 2025 04:02:16 +0000
Labels:           <none>
Annotations:      backup.velero.io/backup-volumes: storage
Status:           Running
IP:               10.244.0.146
IPs:
  IP:  10.244.0.146
Containers:
  busybox:
    Container ID:  containerd://25d3f353c6c2b69e6d1570fa8f4f0bf6a109d6ce634eeecdc71d6870dfae1a93
    Image:         busybox
    Image ID:      docker.io/library/busybox@sha256:37f7b378a29ceb4c551b1b5582e27747b855bbfaa73fa11914fe0df028dc581f
    Port:          <none>
    Host Port:     <none>
    Command:
      sleep
      3600
    State:          Running
      Started:      Thu, 08 May 2025 04:02:18 +0000
    Ready:          True
    Restart Count:  0
    Environment:    <none>
    Mounts:
      /mnt/data from storage (rw)
      /var/run/secrets/kubernetes.io/serviceaccount from kube-api-access-28zwv (ro)
Conditions:
  Type              Status
  Initialized       True
  Ready             True
  ContainersReady   True
  PodScheduled      True
Volumes:
  storage:
    Type:       PersistentVolumeClaim (a reference to a PersistentVolumeClaim in the same namespace)
    ClaimName:  test-pvc
    ReadOnly:   false
  kube-api-access-28zwv:
    Type:                    Projected (a volume that contains injected data from multiple sources)
    TokenExpirationSeconds:  3607
    ConfigMapName:           kube-root-ca.crt
    ConfigMapOptional:       <nil>
    DownwardAPI:             true
QoS Class:                   BestEffort
Node-Selectors:              <none>
Tolerations:                 node.kubernetes.io/not-ready:NoExecute op=Exists for 300s
                             node.kubernetes.io/unreachable:NoExecute op=Exists for 300s
Events:
  Type    Reason     Age    From               Message
  ----    ------     ----   ----               -------
  Normal  Scheduled  3m31s  default-scheduler  Successfully assigned ose-backup-demo/test-busybox-pvc to k8s-template
  Normal  Pulling    3m30s  kubelet            Pulling image "busybox"
  Normal  Pulled     3m30s  kubelet            Successfully pulled image "busybox" in 451ms (451ms including waiting)
  Normal  Created    3m29s  kubelet            Created container busybox
Normal Started 3m29s kubelet Started container busybox5. Exec into the pod:
kubectl exec -it test-busybox-pvc -n ose-backup-demo -- sh6. In the shell, I will create a file under the PV file path /mnt/data and input the text Original
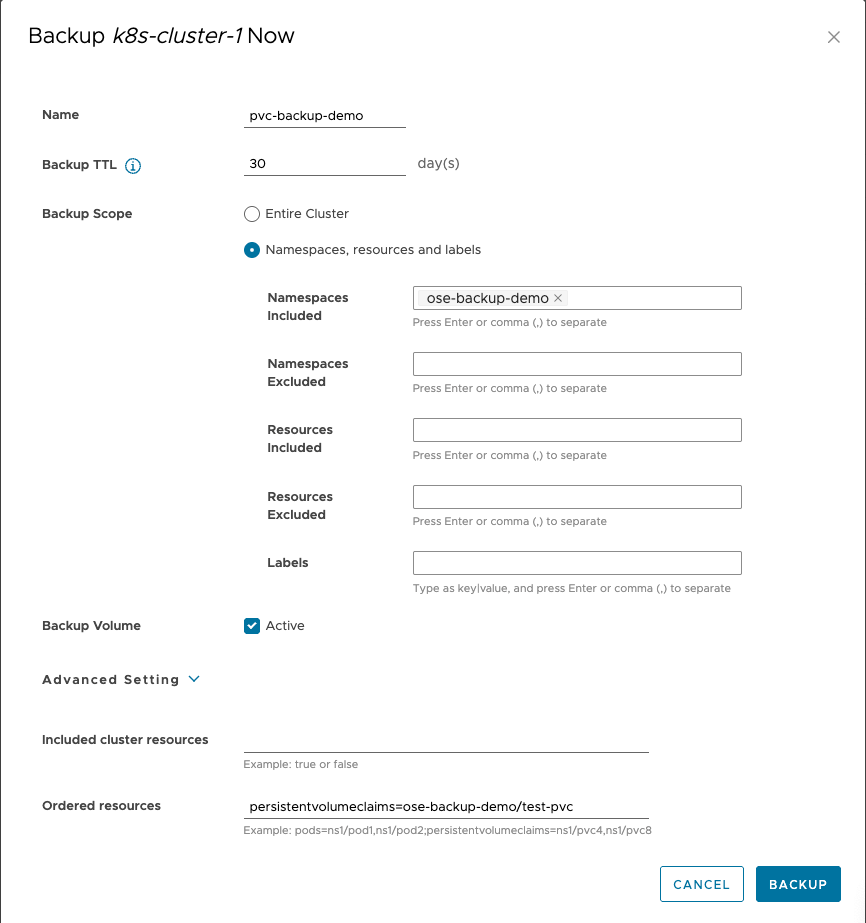
cd /mnt/data && echo "Original" > test.txt7. Let's create a backup of the ose-backup-demo namespace and include the PersistentVolumeClaim:
- In the Advanced Setting, add the following string in the Order resources field for the
PersistentVolumeClaim
persistentvolumeclaims=ose-backup-demo/test-pvc
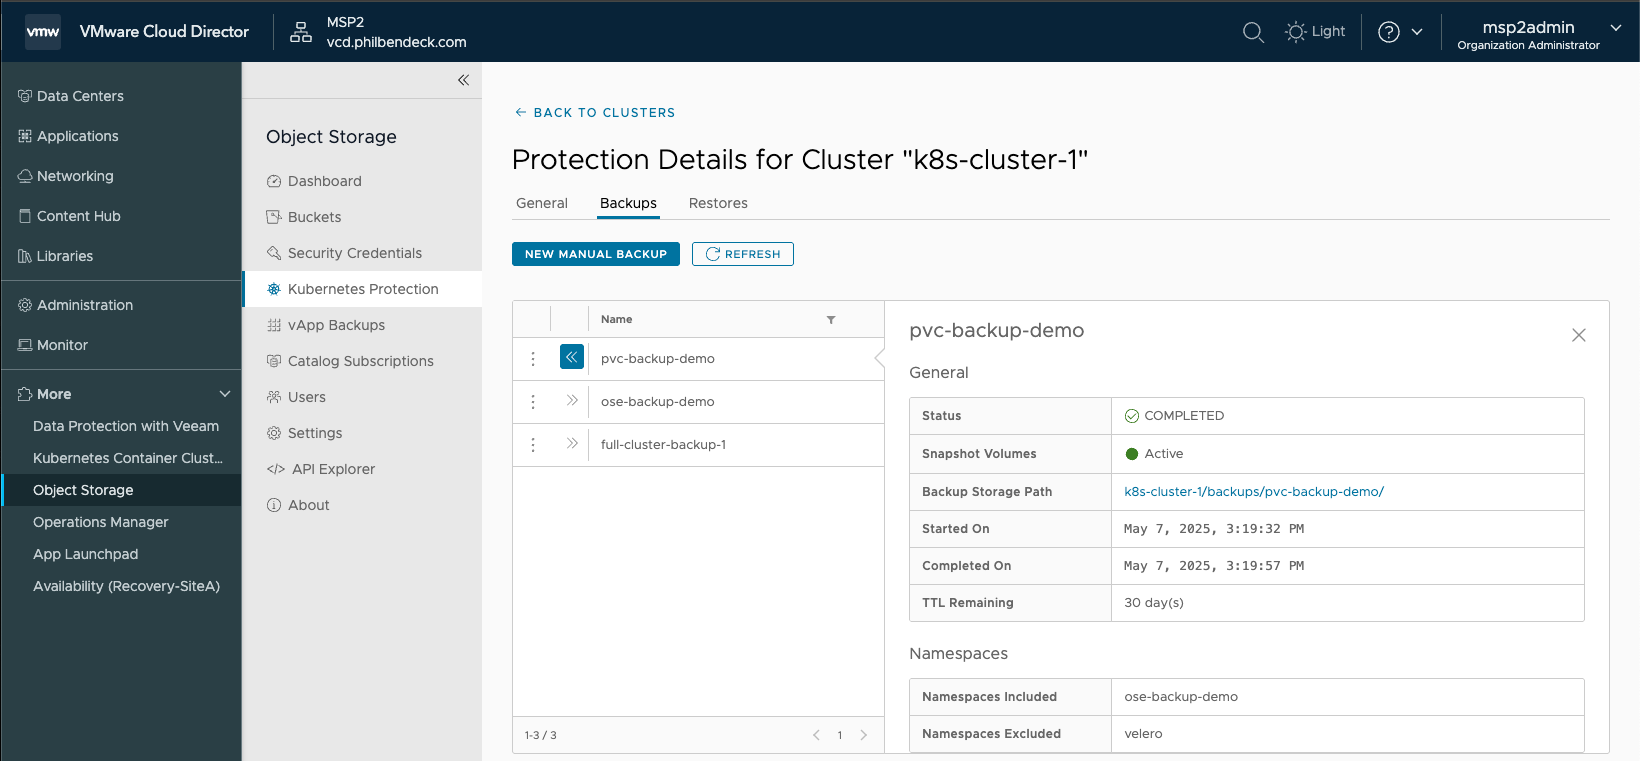
8. Ensure the back up completed successfully:
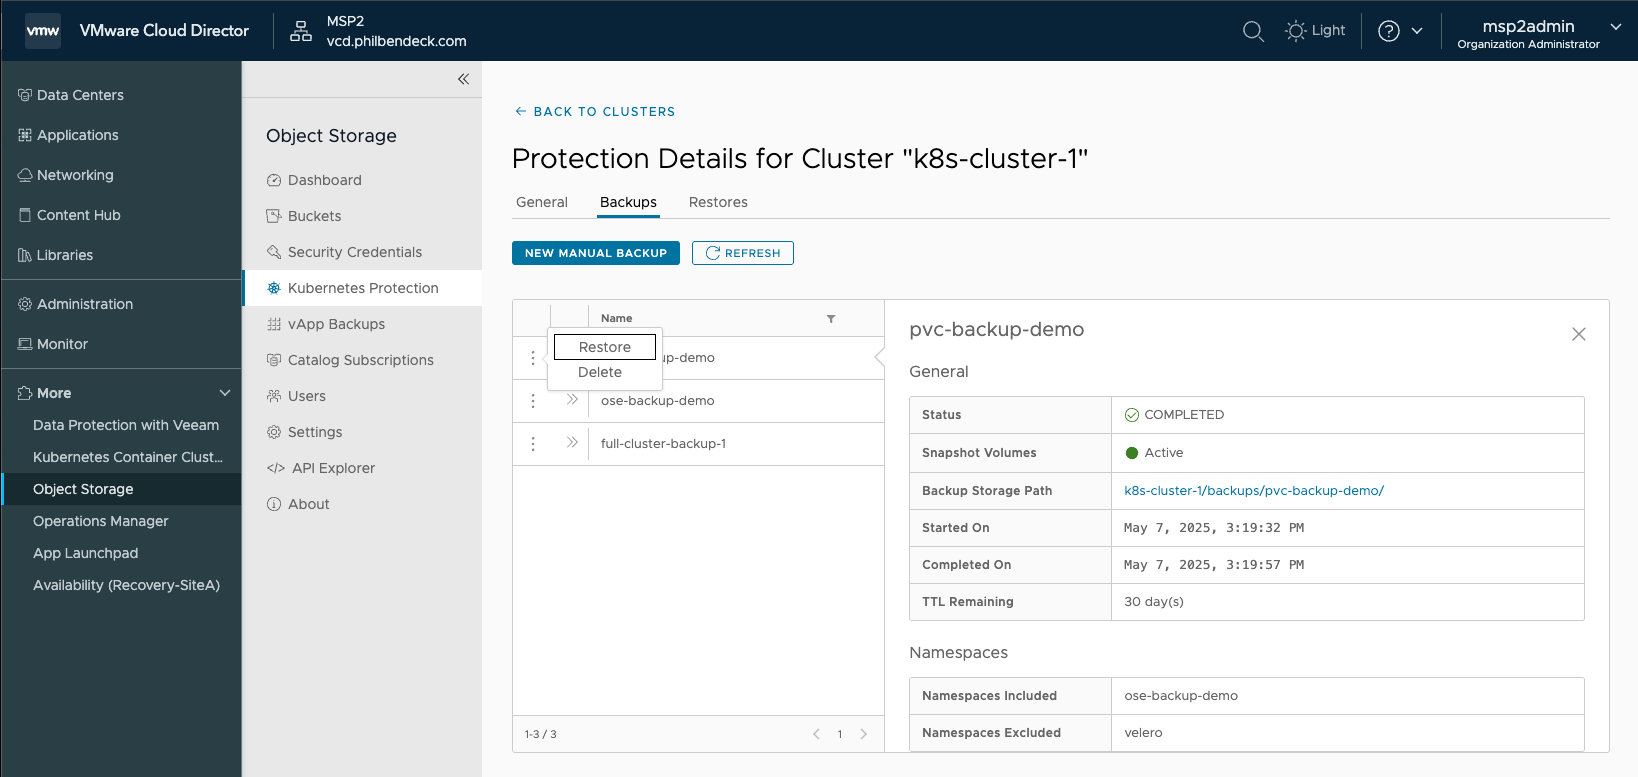
9. Delete the test-busybox-pvc pod:
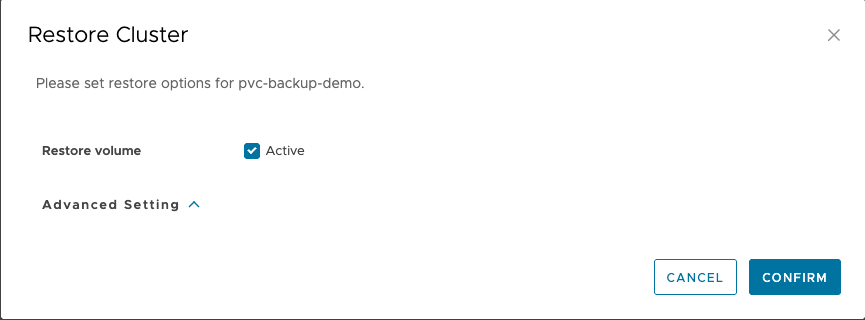
kubectl delete pod test-busybox-pvc -n ose-backup-demo10. Restore the ose-backup-demo namespace by selecting the ellipses > Restore:
11. Select CONFIRM
12. Ensure the Restore completed successfully:

13. Check the pod and ensure it got restored in the ose-backup-demo namespace:
kubectl get pods -n ose-backup-demo | head -n 1 && kubectl get pods -n ose-backup-demo --no-headers | grep test-busybox-pvc14. Ensure the file that was stored in the PV is listed:
kubectl exec -it test-busybox-pvc -n ose-backup-demo -- sh15. In the pod, cat the file test.txt located in /mnt/data/
cat /mnt/data/test.txt
kubectl exec -it test-busybox-pvc -n ose-backup-demo -- sh
/ # cat /mnt/data/test.txt
Original